
Your storefront — what buyers see
Every published event gets a public storefront page — branded yours, working the same on a phone as a laptop. This is the journey your buyers take, so you know what they’re seeing when they call.
Where your pages live
Every event sits at /e/<your-event>, and each order your buyers manage at /order/<reference>. You set an event’s address under Storefront on the event itself; until you do, the event is still reachable at its reference.
Your own public page
You also get one page listing everything you have on sale, at /o/<your-handle>. Choose the handle under Settings → Public page in the console and the page goes live; clear the handle and it comes down. It is available on every plan.
The page carries your logo and colours, lists your published events with a filter and a sort, and offers a month view for browsing by date — a run of dates shows on each night it actually plays, not every day in between. Buyers open an event from the list as usual. On Starter and above you can add a page intro above the list — who you are and what you put on, with images if you want them — from the same Settings → Public page screen; see Branding & white-label.
On Starter and above you can also write an introduction for the top of the page — a paragraph about who you are, with an image if you want one. It lives with your other storefront text under Settings → Storefront content, and is authored per language like the rest.
The event page
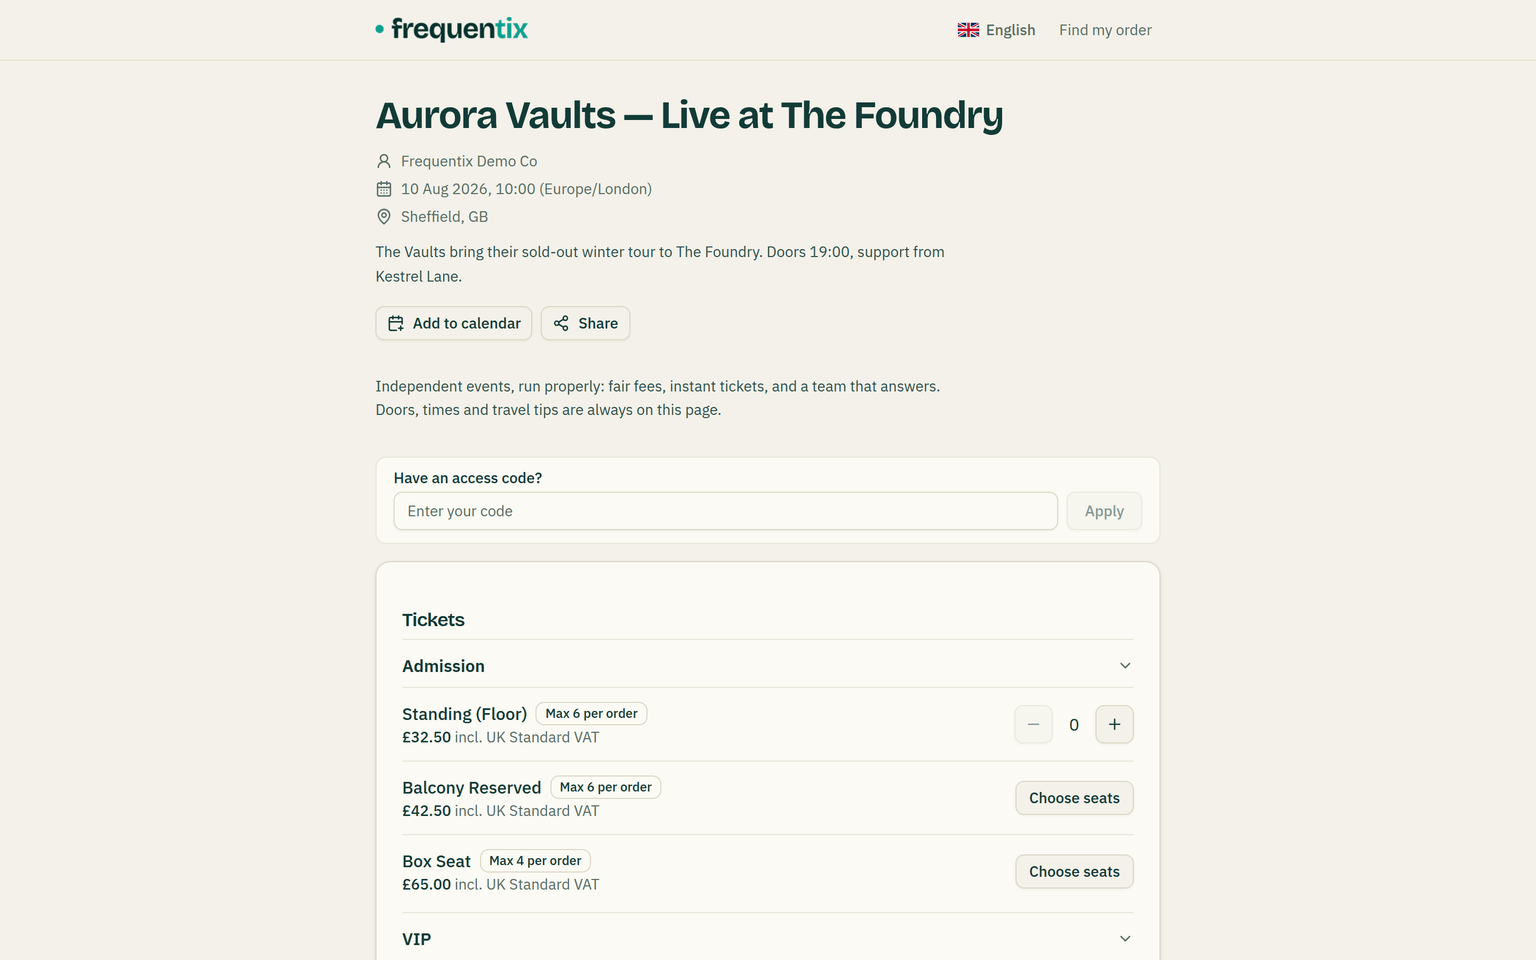
- The page shows your branding, description, venue and the ticket types currently on sale. Remaining stock is only disclosed when 10 or fewer remain — urgency reads without your sales volumes going public.
- An event flagged as an online event shows “Online event” in place of the venue line. The joining link never appears here — it reaches ticket holders by email, with their confirmation and any reminders.
- Every ticket type, add-on and bundle shows its own description beneath the name. Long ones settle at two lines with a Read more link that opens the rest in place, so write as much detail as the item needs — a phone screen stays scannable and nothing is kept from your buyers.
- On a run, buyers pick their date first, and each date carries the same 10-or-fewer remaining count. Cancelled dates are simply absent; a sold-out date can still be chosen, because that is where its waitlist lives — hiding the date would hide the queue.
- On a seated event, buyers pick their exact seats on the live map, with availability refreshing as others buy.
- Hidden types appear only with an access code or private link.
- Buyers can switch the whole journey between five languages from the header; dates render in their language, always in the event’s timezone. The page follows the buyer’s light-or-dark preference too.
- An Add to calendar menu offers an Apple/Outlook calendar file plus Google and Outlook.com links, and a share menu covers the usual networks. On a timed-entry day the calendar entry spans the day’s opening hours rather than flooding a diary with every slot.
- Every event page carries structured data (schema.org), so search engines can show dates, venue and per-ticket prices as a rich result — with per-language alternates wired in.
Basket & checkout
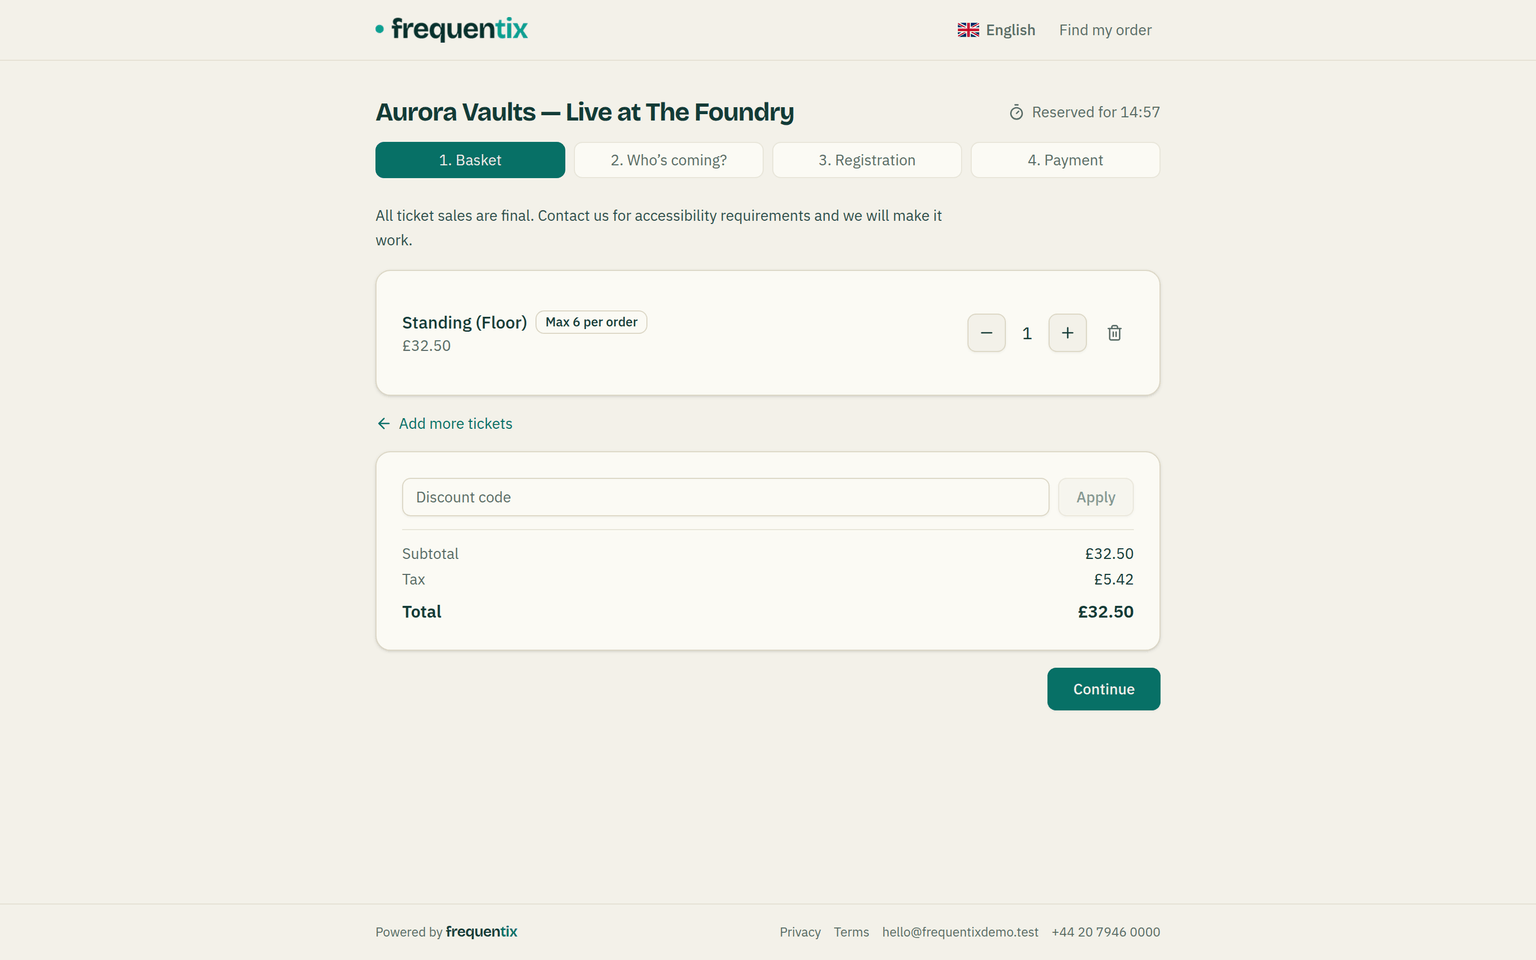
- A basket holds real stock for 15 minutes — the countdown is visible to the buyer. Reaching payment tops the hold up, within a 30-minute ceiling, so stepping back and forth can’t hold stock forever.
- An order with tickets gets a “Who’s coming?” step: each ticket starts settled under the buyer’s own details, and can be assigned to its attendee by name — and the attendee is notified. Names can still be added or changed after purchase, from the order page.
- Registration questions come before payment, and required ones gate it.
- Payment runs on your own Stripe account (Getting paid): cards, whatever wallets your Stripe account and the buyer’s device support — Apple Pay and Google Pay included — and Klarna, for buyers who’d rather spread the cost. Tickets issue the moment payment confirms; free orders confirm directly.
- Discount codes apply in the basket, and a member can type their membership number there for the member price; billing and company details can be added during checkout — or after, for the invoice.
- Where you have invited one, a donation can be added on the event page — your suggested amounts as one-tap buttons, or any amount the buyer types. They can also give without buying a ticket at all, in which case the gift is the whole order. A verified charity additionally offers Gift Aid in the basket: a UK donor gives their name and address and agrees to HMRC’s declaration.
- A ticket type set to pay what you want shows your price as a suggestion, with a box beside it the buyer can change.
After purchase
- The confirmation page and email carry every ticket’s QR, seat labels where seated, and per-add-on QRs. Each pass has its own Apple/Google wallet button, and an order with two or more of them also gets Add all to wallet.
- Wallet passes update live: a cancelled, refunded or re-dated ticket greys out on the buyer’s phone by itself.
- The receipt or invoice is linked right there — see Invoices & receipts.
Buyer self-service
Buyers manage orders through emailed magic links — no accounts, no passwords. From their order page they can re-download tickets, reassign a ticket to a colleague (it re-issues with a fresh QR), add billing details, and read their documents. With Exchange switched on for the event, the same page offers “send to someone else” (a transfer the recipient accepts by email) and “sell at face value” (a resale listing offered to the waitlist) — each action appears only when it would actually succeed.
With buyer self-service cancellation switched on, the same page also carries “cancel tickets for a refund”. Buyers tick the tickets or extras they can no longer use and see exactly what comes back — including any cancellation fee you keep — before they confirm. Their seats return to sale immediately. Everything they cannot cancel is simply not offered, and where a whole order can never be cancelled — because it arrived through Exchange — the page says so rather than leaving them hunting for a button.
- Find my order — a buyer enters their email and gets links re-sent for confirmed orders from the last 12 months. It always answers the same whether or not anything matched, so it can’t be used to fish for customers.
- Marketing emails carry one-click unsubscribe; transactional email (tickets, confirmations) always arrives.
Asking you for help
Below the tickets, the order page has Need help with this order?. A buyer writes a subject and a message, attaches screenshots if they want, and the request arrives under Help → Support tickets linked to the order and the event. They are emailed each reply with a link straight back to the conversation, the page checks for new replies while a request is open, and once you mark it resolved they can rate the help. It is on by default; switch it off in Settings → Support contact and the order page shows your support email and phone instead.